This is the largest W house project we’ve undertaken (yet)! We started this project like most other house projects… with an innocent suggestion. It went something like: ‘wouldn’t this space be awesome if we had an extra three feet of headroom and we could move the stair?’ Somehow, the expected reaction from two people with experience in design and construction was not what you’d expect– we didn’t think anything of it. Maybe because we I didn’t actually think we would do it. Then we repeated the idea enough times until it became part of ‘the plan.’
Then, one day this past spring (2017), Mike had a ‘schedule’ in mind for the project and we began to seriously discuss it. After several minutes of talking about how cool the room would be and what we would do with all this new extra usable space, we began to map out the expected design and construction challenges. At that point, we realized we needed to draw the house. THE. WHOLE. HOUSE.
Drawing the House
Since we weren’t just raising the roof, but also moving a stair, we needed to make sure everything lined up. Since the house is over 90 years old and has been added on to several times, the walls just didn’t line up. So, we got the laser measure out and began documenting the house, room by room. After a couple of weekends, I had modeled the majority of the house, including the new ‘upstairs.’
Before & After Drawing of the Front

Before & After Drawing of the Back

Filing the Drawings (the not so fun stuff)
Aside from the practical benefits of having the model of the house as we developed the design and actually carried out the build, having a good survey of the house made it easy for us to generate filing drawings.
Since the scope of the project extended far beyond an interior renovation, we needed to file the project drawings with the town and obtain a permit. After reading through the town’s zoning regulations, we determined the new height of the house was within the permitted parameters. Then, we gathered all the required documents and information and decided to file the drawings as a ‘homeowner.’
Most jurisdictions allow homeowners to file drawings for single family home projects within a determined scope without requiring the oversight of an architect, engineer or contractor. Obviously, for projects that are beyond those parameters, including those that require structural work, most jurisdictions will require at least an engineer to sign off. This is not to say that all homeowners should tackle large projects like this one without professional advice, but rather that they can limit the use of professional services to what they actually need help with. (Now, how you determine what you really need help with is a different story).
Since our town requires drawings to be filed in person, we went in early one morning and after a brief meeting with the town administrators, we officially submitted the drawings. Then, while we waited for the permit issuance, Mike began to prepare the space and plan out all the materials for the actual build. In addition to the framing materials, Mike ordered insulation and waterproofing for the walls and roof along with 13 custom ProLine 450 series Pella windows.
About a month later we had a permit just in time to take advantage of a long weekend in April. Then, over the course of one day, Mike + crew dismantled the existing roof. The next day, along with our friendly framing crew, Mike built the new walls and roof.
The Before

At some point in the 1970’s, the family that owned the house at the time built a sort of dormer that spanned almost the length of the main house structure. This addition was actually filed with the town as a legal bedroom, but there is no record of any drawings. Essentially, the previous owner built the space without much thought. The stair connecting the space to the main house landed smack in the middle of the room, and the existing ridge beam determined the height of the space. We speculate, the intention was to minimize structural work and to avoid moving any walls at the lower level. This resulted in it a very awkward space with very low ceilings and no reasonable flow. For reference, the ceiling height was 6’8″ at the high point (by the closets) and 6’6″ by the windows.


The first step in order to prepare for the exterior demo was to remove all the finishes, including the walls, closets and the groovy marigold shag carpet.


Once the interior finishes were gone, the room was ready to undergo demo. Just as quickly, with the help of a couple of guys, Mike removed the windows, the remnants of the insulation and the roof!

Raising the Roof
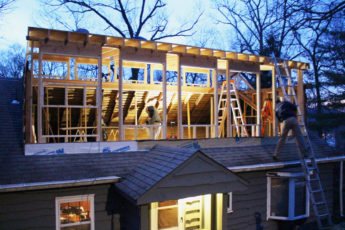
The next morning, we were ready to begin construction. Building the new upstairs would constitute replacing the ridge beam, framing new walls with new window openings and framing the roof. Our friendly framing crew had to complete all of that in a day, not only because it was the only time they were available, but also because we weren’t looking forward to another night without a roof on half the house. The picture above is from early that morning, right after they removed the existing ridge beam and installed temporary supports to hold up the existing roof and rafters.

In the process of installing the new ridge beam, the crew noticed we had made an incorrect assumption regarding the position of the existing beam. When we documented the house, the existing beam was not visible, so we made an educated guess. Then, we had very little time (about 12 hours) between the end of the major demo and the beginning of the build, so we didn’t get a chance to double check our initial survey.
After scrambling for a few minutes to understand where the discrepancy happened, we quickly redrew the new wall and ridge beam at the correct height to meet the existing rafters and we came up with new benchmark measurements for the carpenter. Luckily, this only meant the ceiling would be nine inches higher than designed at the high point, which then yielded a slightly steeper pitch on the roof. This didn’t drastically change the required rafter length, so we didn’t need to get new materials to span the distance. It also meant the windows we had purchased for the east wall did not need to change. Our new high point height (on the side where the closets used to be) is now 9’7″.

Then, the guys framed and installed the walls, beginning with the east facade (the front of the house).

After that, they built the rear wall.

Finally, they set the roof rafters and installed the majority of the roof substrate.


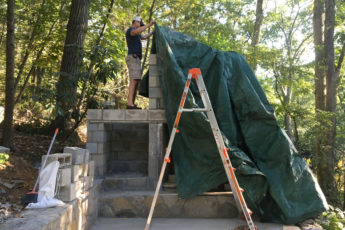
Although we (sorta) had a roof at this point, the house was not yet enclosed and since we only work on the house during the weekends, we needed to temporarily enclose the house until the next weekend. Before covering up the windows, Mike applied the first coat of peel & stick waterproofing to the roof since that is the best way to protect the substrate until we were able to schedule the roofer to come out.


What is the current project status and what is next?
This crazy start to the project was just the beginning! At the time we took the picture above, we still needed to complete a lot of steps before even considering the house watertight. Not to mention all the other work we still need to do before we can even use the room.
Even though we had already completed the process of getting the house watertight when I wrote this post, I decided to make a dedicated post just for that. Roofing and waterproofing can be some of the most technically challenging aspects of construction, although fairly simple if planned and performed correctly. There is just so much useful product and methods information from this project that is worth sharing.
Additionally, Mike has also already moved the stair and taken care of a pretty scary structural issue that we became aware of as we completed the major framing parts of the project. Those two items will be the subject of yet another post!
Hopefully, I can get the blog caught up with the work, given I’m almost a year late getting the blog started. Maybe create and share a timeline of the work? That would also be a good way to track how many actual work days it takes us to complete each project, which certainly is valuable information.
In the meantime, I will try to keep up the regular posts so I can get more of these crazy projects out there, including the juicy details and the cool photos. We definitely have plenty of material yet to share, so check back soon for more updates big and small!
 ‘No Small Plans’ is a work in progress. The original intent is to use this space to document and share, through photographs, drawings and product information, the (eventual) complete